How to make a Waldorf-inspired wool fairy tutorial

Create Waldorf-inspired wool fairies with this easy step-by-step tutorial and bring the magic of fairies to your home.
These wool fairies take practice and a little time to perfect, but with this tutorial, you should be creating beautiful fairies in a very short space of time. And once you master them, they become easy.
Wool fairies have a delicate and subtle beauty. When hung from a window, the light goes through them, and they seem to shine.
Creating a wool fairy is another wonderful way to work with wool. And each one you make will be special and unique.
Wool fairies are a beautiful adornment anywhere in your home, and they will give you and anyone else who sees them a feeling of pleasure.
How to use a felting needle:
For this wool fairy, we will use the felting needle to firm the ball of wool we use for the head, and to firm and shape some attachings of wool.
Felting needles come in different sizes, fine, medium and large. For this fairy, you can use a medium one.
You will need a sponge to work with a felting needle. I use a car wash sponge, but a common washing sponge will work well too.
Hold the needle from the top half up on the sponge and move in a straight vertical motion.
The felting needles are delicate and break easily, and are very sharp! Use them carefully if you have never worked with felting needles before.
Recommendations for Beginners:
- If you have never worked with wool before, you might find it easier to start with coarser roving wool and then move to a finer roving wool like merino wool.
- Practice using the felting needle before you start making your fairy.
- Winding wool around the pipe cleaner is not that easy if you have never done it before. Practice before making your wool fairy. Use thin amounts of wool, and you can try holding the wool and moving the pipe cleaner around. And also

Materials:
- Wool roving. For this, I use 6 different Corriedale wool colours.
- 1 pipe cleaner
- Felting needle (medium size)
- Sponge (for needle felting)
Step 1, The head:
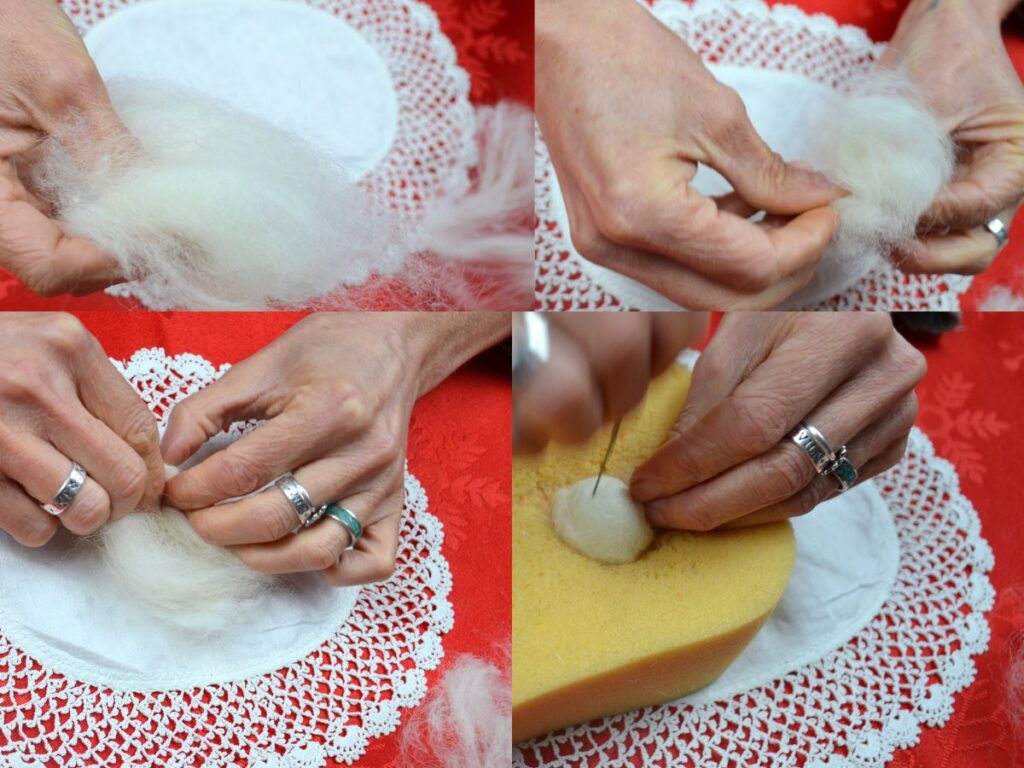
With a piece of light colour wool, wind a ball of wool. Make a ball of about golf ball size, the final head should be 5 cm, use your felting needle to firm it up, and it will decrease the size.

If it feels soft, like the first picture, work with the felting needle a bit longer until it firms up.

Now we are going to cover the ball with a piece of skin-colour wool (about 15 cm long), and tie a thin strand of wool by winding it around in the middle

Lay the ball of wool in the middle of the skin coloured wool you just made. Make sure that the knot stays in the middle at the top of the ball (the top of the head). Tie a piece of wool around the neck, as shown in the pictures. This will be the head.
Needle felt, where you tie a knot.

Step 2, The arms:
Measure the hands and cut the pipe cleaner. Bend it tightly once around the neck.

Wind around the pipe cleaner a thin piece of the same coloured wool you use for the head, starting from one end of the pipe cleaner. Do this for about 2 or 3 centimetres. Bend the wound pipe cleaner to form the hand, wind more wool around it, and continue winding the wool until you reach the neck.

When you reach the neck, go crosswise around the chest and neck.
Starting from the other end of the pipe cleaner, do the same for the other hand.

Go crosswise again when you reach the chest and around the waist.
Needle felt the chest to firm it.

Step 3, The body:
Take a generous piece of dark red (or any colour you like) of about 25/30 cm long, and another piece of a different colour and put it on top.
With your fingers, open a hole in the middle and pass the head through it.

Tie a long green piece of wool around the waist and crosswise around the neck.
Make a knot at the back of the fairy.

Step 4, The hair:
Take another colour for the hair, the length you want.

Needle felt a line along the middle of the head to attach the hair.

Step 5, The wings:
Cut a piece of wool for the wings, around 20 cm. I use white. And tie a thin piece of wool around the middle.
Needle felt to attach the wings to the back of the fairy.

And look how beautiful it looks 💖

Step 6, The hanging thread:
With a long threaded needle, come from under the fairy to the centre of the head and back in through the same place, and come out in the middle of the wings at the back of the fairy. Then go back from there to the middle of the head again and back to the middle of the wings, and this time hold the thread, don’t let it go all the way.

Tie a knot, cut the excess thread that is not needed and then gently pull on the thread at the top of the head.

And that’s it!

There are so many creative ways to make different ones


Please let me know in the comments how your wool fairies come out.
Buy wool and felting needles at myriadonline or worldofwool